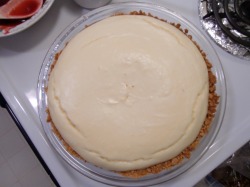
Pandan, also known as screw pine, has a very subtle, yet distinct sweet taste. When I went to United Noodles to buy the leaf, the elderly Chinese woman at the check out asked me in what dish I would be using it. I told her I was making soy milk. She seemed surprised that a woman of my age would be making it from scratch and responded that she had never used pandan in her cooking. Apparently, this is an ingredient more prevalent in cuisine south of the Chinese border and mainly in desserts. It goes well with the creamy richness of coconut milk in Pandan Chiffon cake or Serikaya (Pandan Jam). In fact, now that I'm thinking about the uses for pandan, those are the only three things I have ever made with it: Soy Milk, Pandan cake, and Serikaya. In this post however, I'm only going to go through the process of making Soy Milk and Serikaya.
Soy Milk
Soy Milk and Cookies
Ingredients:
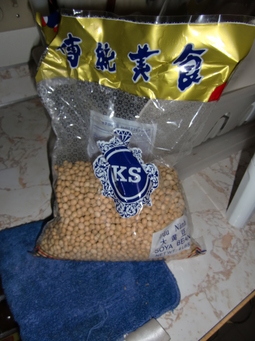
Soy Beans
Water
Pandan
Sugar (Brown, White, Palm, whatever you want. In the past, I've used a mixture of Brown and White mainly because it is readily available. However, my mom prefers Palm Sugar.)
You may notice that there are no measurements. This is mainly because I have no idea. After the first time, you can gauge for yourself whether you need more or less of any ingredient.
Tools:
Blender
Cheesecloth
Clips
Stock pot
Blender
Cheesecloth
Clips
Stock pot
Directions:
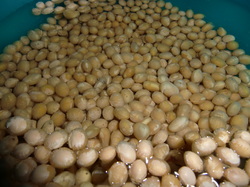
To make about 12 cups of Soy Milk, put about 1 lb of soy beans into a bowl and soak overnight. It may not look like a lot but trust me, they will expand. On a side note, if you're not going to make the milk the next day, drain your beans and replace the water every 12 hours or so. Otherwise they start to ferment and that's not good.
To make about 12 cups of Soy Milk, put about 1 lb of soy beans into a bowl and soak overnight. It may not look like a lot but trust me, they will expand. On a side note, if you're not going to make the milk the next day, drain your beans and replace the water every 12 hours or so. Otherwise they start to ferment and that's not good.
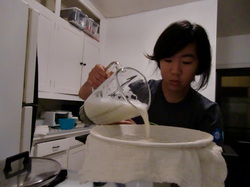
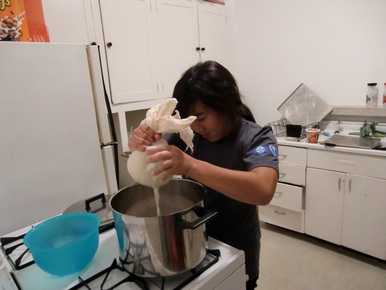
Prepare a stock pot with at least 2 layers of cheesecloth over the top. Use clothes pins if you can. I didn't have any, so I used a rubber band. This makes it tricky to remove the cheesecloth when you need to squeeze out the milk. I dropped the entire cloth, crumbs and all, into the pot the second time I did this. If you are more coordinated than I am, rubber bands may work just fine. When you arrange the cheesecloth over the pot, do not make it taught; you want to create a slight well when you pour your soy water through. Alternatively, for even clearer milk, you can prepare a large bowl and a stock pot with cheesecloth. This way, you sieve the soy fluid twice.
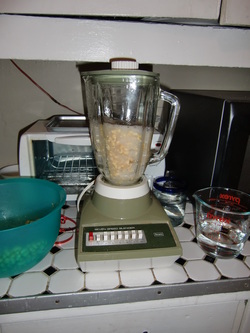
Drain your soy beans and replace with fresh water right before use. Put 1 cup of soy beans and 2 cups of water in a blender. Pour through cheesecloth. Once your cheesecloth is full, generally after about 4 cups of beans passing through, gather the corners of the cloth and create a pouch making sure to keep all the soy bits inside.
Squeezing Milk Through Cheesecloth
Twist the top and squeeze the liquid through the cheesecloth. Reserve the crumbs in a separate bowl. Repeat until you have used all the soy beans.
When all the soy beans are gone, put the crumbs in the blender with water, blend and strain again. Keep in mind, 1 cup of crumbs is more dense than 1 cup of soy beans. You will want to put in more water per cup than you did with the whole beans. After the second time through, you can throw out the crumbs or, I'm also told you can make soy bread with them. I personally have never tried that.
When all the soy beans are gone, put the crumbs in the blender with water, blend and strain again. Keep in mind, 1 cup of crumbs is more dense than 1 cup of soy beans. You will want to put in more water per cup than you did with the whole beans. After the second time through, you can throw out the crumbs or, I'm also told you can make soy bread with them. I personally have never tried that.
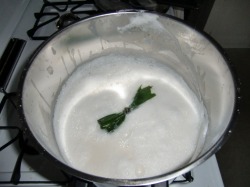
Pandan in Soy Milk
After squeezing out all the juice you can get from the crushed soy beans, remove the cheesecloth and heat the milk over a low heat, stirring often. Make sure the bottom does not burn. After about half an hour add pandan to the pot. When the pot comes to a boil, turn off the heat, remove the pandan, and add sugar to taste. The boiling point comes on quickly and suddenly. This is not something you can just leave on the stove while you do something else. It will boil over if you are not careful.
Soy Milk and Beans
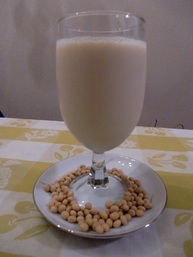
Allow soy milk to cool then transfer to containers and refrigerate. Enjoy! If you refrigerate soy milk, it will stay good for a couple weeks. This is not the same soy milk that you can buy at a typical grocery store. It's much better.
Serikaya is the second of three recipes I can think of that use pandan. It is essentially an egg custard but it is often used more like jam. In Malaysia, my cousins and I eat it on toast. My mother used to make it for me in the States as well. Growing up, one of my favorite childhood memories is eating homemade serikaya on toast. You can also buy it at some Asian grocery stores. I have to say, I think my mom would be proud of the batch I made up. It tasted just like Malaysia.
When my mom makes this, she uses the microwave. Due to my lack of microwave safe bowls large enough, I used the stove and simply had to stir the mixture constantly to avoid burning. The recipe is as follows:
Ingredients:
4 eggs
2 cup sugar
1/2 can of coconut milk
3 pandan leaves
Instructions:
Beat the eggs and sugar together. Put in pot over low heat. Stir in coconut milk. Stir constantly to avoid burning on the bottom. After the custard starts to come together a little, add the pandan leaves. Cook until desired texture is achieved.
When you buy this from the super market, it is smooth, like thick syrup. To get this consistency, after you cook the Serikaya, put it in a blender and blend. If you don't to this, you end up with small chunks. Personally, I prefer the chunks. It gives my mouth something to feel.
Along with putting this on toast, another common application is putting it inside a bun creating kaya bao. If you know a good roll recipe, use that. Otherwise, I just buy Rhodes Dough from the grocery store. If you buy the dinner rolls, you can follow the directions below:
Allow rolls to defrost and rise on a tray. Keep in mind these will expand a lot. In the mean time, how ever many bao you are making, cut out that many squares or wax paper; 3-4 in squares should do the job just fine. After they are soft, press a ball flat onto the table making the edges thin and the center thicker in comparison. It's like the opposite of shaping a burger. Place about 1 Tablespoon of Kaya in each bun. Grab the edges of the dough and pull over the Kaya. When all the edges come together, twist the bottom and place on a wax paper square. Let rise again. Just before placing them in the oven, brush an egg wash over the tops. Bake according to directions on package.
I didn't have time for Pandan Chiffon cake, but perhaps that will be a future post. Also, I feel I must apologize for my lack of pictures in this post. They got deleted off the camera before I could upload them to my computer. The next time I make Soy Milk or Serikaya, I will update this post to be more visually appealing.
P.S. It's back to school time for me meaning back to the dorms. Unfortunately I probably will not be doing as much cooking as I have been doing this summer so posting will be even less frequent. Hopefully back to school does not mean my readership will fall as well.